All the code’s here: https://github.com/serafdev/argocd-tutorial
Here we’ll be deploying ArgoCD resources with Terraform on a local Kubernetes Cluster (KIND) for a true IaC infrastructure
We’ll be using this great provider: https://registry.terraform.io/providers/oboukili/argocd/latest
# Setup Kubernetes
First, let’s get a Kubernetes Cluster running. We’ll be using [KIND](https://kind.sigs.k8s.io/) for simplicity. You can directly go to their Installation guide here: https://kind.sigs.k8s.io/docs/user/quick-start/#installation
- Create a Cluster, run `kind create cluster -n argo-demo`:
❯ kind create cluster -n argo-demoCreating cluster "argo-demo" ...✓ Ensuring node image (kindest/node:v1.25.3) ?✓ Preparing nodes ?✓ Writing configuration ?✓ Starting control-plane ?️✓ Installing CNI ?✓ Installing StorageClass ?Set kubectl context to "kind-argo-demo"You can now use your cluster with:kubectl cluster-info --context kind-argo-demoHave a question, bug, or feature request? Let us know! https://kind.sigs.k8s.io/#community ?2. Switch Context with `kubectl cluster-info — context kind-argo-demo`:
❯ kubectl cluster-info --context kind-argo-demoKubernetes control plane is running at https://127.0.0.1:40667CoreDNS is running at https://127.0.0.1:40667/api/v1/namespaces/kube-system/services/kube-dns:dns/proxyTo further debug and diagnose cluster problems, use 'kubectl cluster-info dump'.3. Test `kubectl`
~ via ? v3.10.6 on ☁️ ❯ kubectl get allNAME TYPE CLUSTER-IP EXTERNAL-IP PORT(S) AGEservice/kubernetes ClusterIP 10.96.0.1 <none> 443/TCP 92s~ via ? v3.10.6 on ☁️ ❯ kubectl get namespacesNAME STATUS AGEdefault Active 97skube-node-lease Active 98skube-public Active 98skube-system Active 98slocal-path-storage Active 94s4. Install Argo CD with these commands (https://raw.githubusercontent.com/argoproj/argo-cd/stable/manifests/install.yaml):kubectl create namespace argocd && \
kubectl apply -n argocd -f https://raw.githubusercontent.com/argoproj/argo-cd/stable/manifests/install.yaml
5. Verify Installation `kubectl get pods -n argocd`❯ kubectl get pods -n argocd
NAME READY STATUS RESTARTS AGE
argocd-application-controller-0 1/1 Running 0 57s
argocd-applicationset-controller-676749c97d-x79cs 1/1 Running 0 57s
argocd-dex-server-68fdffbdb6-6z2mh 1/1 Running 0 57s
argocd-notifications-controller-56578cd466-nz9zq 1/1 Running 0 57s
argocd-redis-8f7689686-wz6qb 1/1 Running 0 57s
argocd-repo-server-658b549674-5n4cw 1/1 Running 0 57s
argocd-server-5b69986577-mjpnw 1/1 Running 0 57s
Ok we’re ready to work now!
# Preparing the Terraform Module
Now we want to create the IaC for the ArgoCD resources. There is other options like writing YAMLs but I found that very annoying to maintain when:
– Iterating the ArgoCD resources settings
– Upgrading/Modifying Projects and Application/ApplicationSets as it’s not clear what changed exactly between versions
Terraform uses the ArgoCD APIs so it tells you exactly what will be changing when running `terraform plan`. Anyways, let’s move on.
## Setup ArgoCD
- Get your Credentials:kubectl get secrets/argocd-initial-admin-secret -n argocd -o jsonpath='{.data.password}’|base64 -d
That command will print the argocd initial admin password, in the above command we’re simply outputing `.data.password` and piping to `base64 -d` to decode the `base64` string.
Copy that
2. Port Forward the ArgoCD Server to `:8081` or a port of your choice❯ kubectl port-forward svc/argocd-server -n argocd 8081:443
Forwarding from 127.0.0.1:8081 -> 8080
Forwarding from [::1]:8081 -> 8080
3. Login:❯ argocd login localhost:8081 – insecure – username admin – password rTh09Ww0qmwPdVv-
‘admin:login’ logged in successfully
Context ‘localhost:8081’ updated
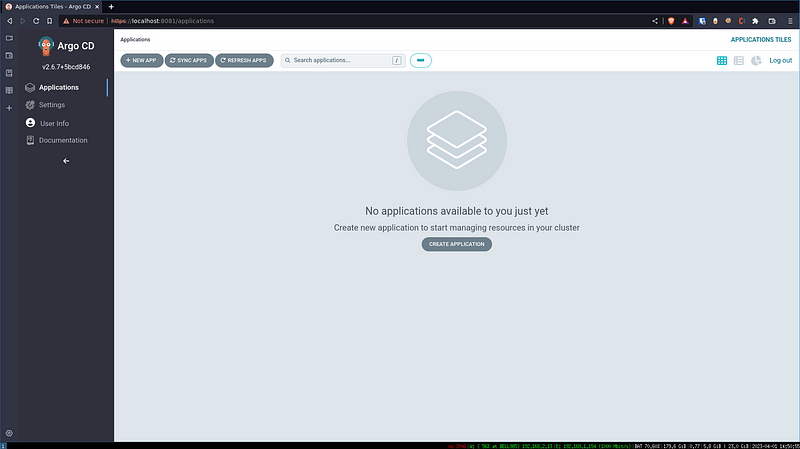
4. Check on your UI at https://localhost:8081, login with `admin` and the password you got from the previous steps, you should see this:
## Setup Terraform Provider (and create an ArgoCD Project)
Create a new Folder, e.g: `mkdir -p ~/code/argocd-tutorial/terraform && cd ~/code/argocd-tutorial/terraform`.
- Write the `providers.tf` file:terraform {
required_providers {
argocd = {
source = “oboukili/argocd”
version = “5.0.1”
}
}
}provider “argocd” {
server_addr = “localhost:8081”
}
2. Prepare your first Project, create a file named `project.tf` and paste this content:resource “argocd_project” “myproject” {
metadata {
name = “myproject”
namespace = “argocd”
labels = {
acceptance = “true”
}
annotations = {
“this.is.a.really.long.nested.key” = “yes, really!”
}
}
spec {
description = “simple project”
source_namespaces = [“argocd”] source_repos = [“*”]
destination {
server = “https://kubernetes.default.svc”
namespace = “default”
}
destination {
server = “https://kubernetes.default.svc”
namespace = “demo”
}
cluster_resource_blacklist {
group = “*”
kind = “*”
}
cluster_resource_whitelist {
group = “rbac.authorization.k8s.io”
kind = “ClusterRoleBinding”
}
cluster_resource_whitelist {
group = “rbac.authorization.k8s.io”
kind = “ClusterRole”
}
namespace_resource_whitelist {
group = “*”
kind = “*”
}
role {
name = “testrole”
policies = [
“p, proj:myproject:testrole, applications, override, myproject/*, allow”,
“p, proj:myproject:testrole, applications, sync, myproject/*, allow”,
“p, proj:myproject:testrole, clusters, get, myproject/*, allow”,
“p, proj:myproject:testrole, repositories, create, myproject/*, allow”,
“p, proj:myproject:testrole, repositories, delete, myproject/*, allow”,
“p, proj:myproject:testrole, repositories, update, myproject/*, allow”,
“p, proj:myproject:testrole, logs, get, myproject/*, allow”,
“p, proj:myproject:testrole, exec, create, myproject/*, allow”,
] }
}
}
NOTE: There’s a few things we will modify here in the following steps, I just want you to understand that this portion is to create a PROJECT that we will use when create APPLICATIONS, it’s simply a resource with a bunch of configs.
NOTE2: Keep the resource_whitelist, resource_blacklist and the role policies at a minimum. Overtime you will see Project Permission issues, you just need to know that it’s all defined here, you’ll come back to patch this up
3. Let’s run terraform plan` on this ArgoCD Project resource. The first line will output the execution plan (nothing is executed yet). At this step take your time reading the log on what are the changes that you’re planning to apply, e.g in this case we want to create a new `argocd_project` resource❯ ARGOCD_AUTH_USERNAME=admin ARGOCD_AUTH_PASSWORD=rTh09Ww0qmwPdVv- terraform plan
Terraform used the selected providers to generate the following execution plan. Resource actions are indicated with the
following symbols:
+ create
Terraform will perform the following actions:
# argocd_project.myproject will be created
+ resource “argocd_project” “myproject” {
+ id = (known after apply)
+ metadata {
+ annotations = {
+ “this.is.a.really.long.nested.key” = “yes, really!”
}
+ generation = (known after apply)
+ labels = {
+ “acceptance” = “true”
}
+ name = “myproject”
+ namespace = “argocd”
+ resource_version = (known after apply)
+ uid = (known after apply)
}
+ spec {
+ description = “simple project”
+ source_namespaces = [
+ “argocd”,
] + source_repos = [
+ “*”,
]
+ cluster_resource_blacklist {
+ group = “*”
+ kind = “*”
}
+ cluster_resource_whitelist {
+ group = “rbac.authorization.k8s.io”
+ kind = “ClusterRole”
}
+ cluster_resource_whitelist {
+ group = “rbac.authorization.k8s.io”
+ kind = “ClusterRoleBinding”
}
+ destination {
+ namespace = “default”
+ server = “https://kubernetes.default.svc”
}
+ destination {
+ namespace = “demo”
+ server = “https://kubernetes.default.svc”
}
+ namespace_resource_whitelist {
+ group = “*”
+ kind = “*”
}
+ role {
+ name = “testrole”
+ policies = [
+ “p, proj:myproject:testrole, applications, override, myproject/*, allow”,
+ “p, proj:myproject:testrole, applications, sync, myproject/*, allow”,
+ “p, proj:myproject:testrole, clusters, get, myproject/*, allow”,
+ “p, proj:myproject:testrole, repositories, create, myproject/*, allow”,
+ “p, proj:myproject:testrole, repositories, delete, myproject/*, allow”,
+ “p, proj:myproject:testrole, repositories, update, myproject/*, allow”,
+ “p, proj:myproject:testrole, logs, get, myproject/*, allow”,
+ “p, proj:myproject:testrole, exec, create, myproject/*, allow”,
] }
}
}
Plan: 1 to add, 0 to change, 0 to destroy.
─────────────────────────────────────────────────────────────────────────────────────────────────────────────────────────────
Note: You didn’t use the -out option to save this plan, so Terraform can’t guarantee to take exactly these actions if you run
“terraform apply” now.
4. Run terraform apply❯ ARGOCD_INSECURE=true ARGOCD_AUTH_USERNAME=admin ARGOCD_AUTH_PASSWORD=rTh09Ww0qmwPdVv- terraform apply
### (skipping known diff from the previous step)
Do you want to perform these actions?
Terraform will perform the actions described above.
Only ‘yes’ will be accepted to approve.
Enter a value: yes
argocd_project.myproject: Creating…
argocd_project.myproject: Creation complete after 1s [id=myproject]
Apply complete! Resources: 1 added, 0 changed, 0 destroyed.
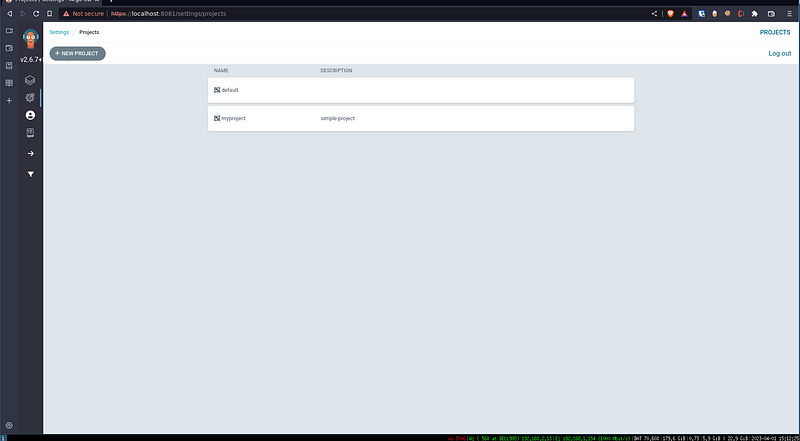
Congrats! You got your project created. Go to `Settings -> Project` you should see `myproject` alongside the default one
## Create a simple application and its deployment
Now that the Terraform Provider is Setup, we have a good understanding on how we communicate between the `terraform module` we’re writing and the argocd namespace in the kubernetes cluster that we created, we can start creating Deployments.
This will involve:
– Creating an App that runs in a Pod (We’ll create a simple hello world pod)
– Creating an [ArgoCD Application](https://registry.terraform.io/providers/oboukili/argocd/latest/docs/resources/application) that will be used to Deploy the Hello World pod
– Nothing else, because we need to keep this simple
– I don’t know how to bullet-point
#### Prepare the Application CI
Create a new Folder, e.g: `mkdir -p ~/code/argocd-tutorial/httpserver && cd ~/code/argocd-tutorial/httpserver`.
1. Create the `main.go`:package main
import (
“io”
“net/http”
“fmt”
)
func main() {
http.HandleFunc(“/helloworld”, func(w http.ResponseWriter, r *http.Request) {
fmt.Println(“Hello World is happening guys”)
io.WriteString(w, “Hello World!”)
})
fmt.Println(“Running server…”)
http.ListenAndServe(“:8082”, nil)
}
The above code simply creates a Go http server and runs on port `:8082`.
Run: `go mod init helloworld && go mod tidy && go run main.go`
You should see:❯ go run main.go
Running server…
On another window, run:❯ curl localhost:8082/helloworld
Hello World!⏎
2. Write it’s `Dockerfile`FROM golang:1.20-bullseye as builder
WORKDIR /app
COPY . .
# Build the helloworld binary
RUN go build -v -o /app/helloworld
# Base Slim Debian Image with nothing in it
FROM debian:bookworm-slim
# Completely useless I think
WORKDIR /app
# Copy from the previous step (builder) the helloworld binary
COPY –from=builder /app/helloworld /app/helloworld
# Run the HelloWorld server
CMD [“/app/helloworld”]
3. You can build and your docker image (last line is from running curl similar to the previous step), `-p` is to map the port 8082 from the host machine to the 8082 of the container we’re creating:❯ docker build -t helloworld .
❯ docker run -p 8082:8082 helloworld
Running server…
Hello World is happening guys
4. Create the folder required for the Docker Build. We will write a very simple Workflow that will build the above image and push it to the Github Container Registry (`ghcr.io`). Run: `mkdir -p ~/code/argocd-tutorial/.github/workflows`.
5. Let’s create the workflow file at `~/code/argocd-tutorial/.github/workflows/docker.yml` and put the following content:—
on:
# Trigger this Workflow when pushing to master
push:
branches:
– master
# Trigger manually
workflow_dispatch:
# Environments used by the Docker Login and the Docker Push
env:
REGISTRY: ghcr.io
IMAGE_NAME: ${{ github.repository }}
jobs:
build-and-push-image:
runs-on: ubuntu-latest
permissions:
contents: read
packages: write
steps:
– name: Checkout repository
uses: actions/checkout@v3
# Login to ghcr.io, Github’s container registry
– name: Log in to the Container registry
uses: docker/login-action@v2.1.0
with:
registry: ${{ env.REGISTRY }}
username: ${{ github.actor }}
password: ${{ secrets.GITHUB_TOKEN }}
# Build the ./httpserver app
– name: Build and Push Image
uses: docker/build-push-action@v4.0.0
with:
context: ./httpserver
push: true
# Always override :latest tag
tags: ${{ env.REGISTRY }}/${{ env.IMAGE_NAME }}:latest
This workflow definition simply does 3 things when something is pushed on the master branch:
– Checkout to the master branch
– Login to the Docker Registry (github.actor is your username and GITHUB_TOKEN is a token passed by default to the Github runner.)
– Use the Docker maintained action to build and push the image. Here we defined the context as `./httpserver` and we’ll always push to the `:latest` tag
6. Let’s create a repository now for all of this stuff, replace serafdev with your username:
1. Create a repository at https://github.com/YOUR_USERNAME/argocd-tutorial
2. `cd ~/code/argocd-tutorial`
3. `git init`
4. A) IF YOU USE SSH KEY: `git remote add origin git@github.com:YOUR_USERNAME/argocd-tutorial`
B) ELSE: `git remote add origin https://github.com/YOUR_USERNAME/argocd-tutorial`
5. `git commit -A -m “First Commit” && git push`
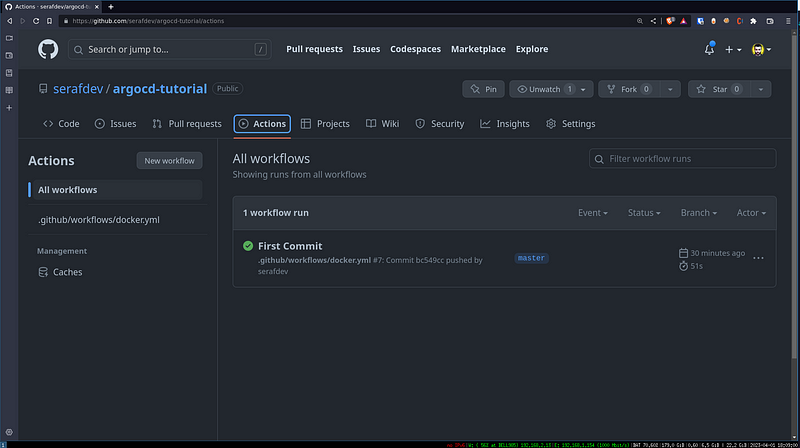
You should see the Action trigger and create a new Package in the Container Registry:
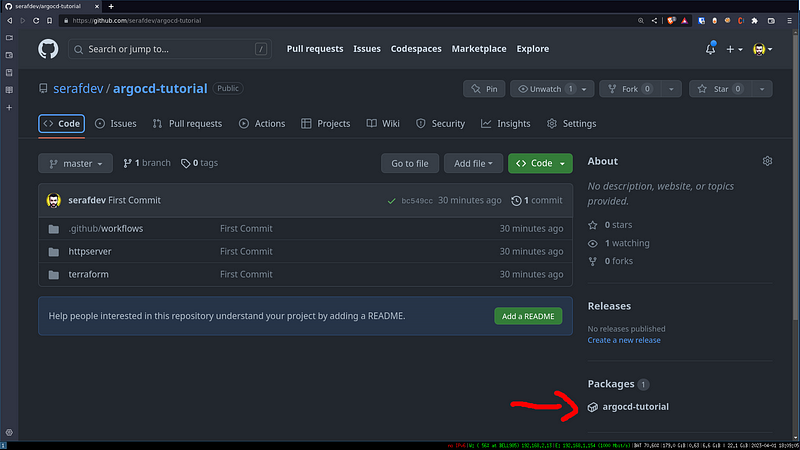
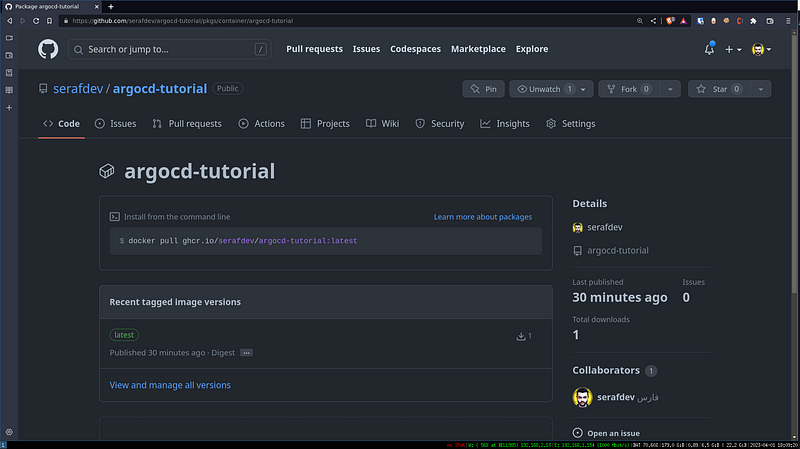
If you want to have a look you can find the package here: https://github.com/serafdev/argocd-tutorial/pkgs/container/argocd-tutorial
Now we can simply pull the image:❯ docker pull ghcr.io/serafdev/argocd-tutorial:latest
latest: Pulling from serafdev/argocd-tutorial
96af4d596c1b: Already exists
86a2ca8b069c: Pull complete
0f040512307a: Pull complete
Digest: sha256:324ed84a74f96895637e7ea7506ca2e2e335b8e7b5c6290831b8e427b377d485
Status: Downloaded newer image for ghcr.io/serafdev/argocd-tutorial:latest
ghcr.io/serafdev/argocd-tutorial:latest
❯ docker pull ghcr.io/serafdev/argocd-tutorial:latest
latest: Pulling from serafdev/argocd-tutorial
96af4d596c1b: Already exists
86a2ca8b069c: Pull complete
0f040512307a: Pull complete
Digest: sha256:324ed84a74f96895637e7ea7506ca2e2e335b8e7b5c6290831b8e427b377d485
Status: Downloaded newer image for ghcr.io/serafdev/argocd-tutorial:latest
ghcr.io/serafdev/argocd-tutorial:latest
Note: It will be hard to detect changes if we always push to `:latest`, we’ll solve this by tagging using the commit hash instead, later in the tutorial
Note2: This is where your test suite should run, in `.github/workflows/` you can also add other pre-build tests and add them as dependencies to the `docker.yml`, so the build is only done if all the other checks are done (tests, coverage, security scans, releases, etc)
### Prepare the Application’s Deployment
Ok, now that we have the CI running, where every commit added to `master` will trigger a new docker build, let’s get the kubernetes resources ready. We’ll be using `Kustomize` for this as it’s the easiest way to deploy a set of resources and still have templating abilities. Kustomize is built-in `kubectl` so let’s go.
- `mkdir -p ~/code/argocd-tutorial/deploy && cd ~/code/argocd-tutorial/deploy`
- Create `deployment.yml` with content:—
apiVersion: apps/v1
kind: Deployment
metadata:
name: helloworld
spec:
replicas: 2
selector:
matchLabels:
app: helloworld
template:
metadata:
labels:
app: helloworld
spec:
containers:
– name: helloworld
image: ghcr.io/serafdev/helloworld
ports:
– containerPort: 8082
resources:
requests:
memory: “64Mi”
cpu: “0.1”
limits:
memory: “128Mi”
cpu: “0.2”
3. Create `service.yml` with content:—
apiVersion: v1
kind: Service
metadata:
name: helloworld
spec:
type: NodePort
selector:
app: helloworld
ports:
– name: http
port: 8082
4. Create `kustomization.yml` with content:—
resources:
– deployment.yml
– service.yml
5. Create the resources and inspect to test if everything is OK:# Run Create using the Kustomize flag (-k/–kustomize)
❯ kubectl create -k .
service/helloworld created
deployment.apps/helloworld created
# Get all resources
❯ kubectl get all
NAME READY STATUS RESTARTS AGE
pod/helloworld-6c566c4f58-5v9ln 1/1 Running 0 10s
pod/helloworld-6c566c4f58-dmc5b 1/1 Running 0 10s
NAME TYPE CLUSTER-IP EXTERNAL-IP PORT(S) AGE
service/helloworld NodePort 10.96.4.224 <none> 8082:30098/TCP 10s
service/kubernetes ClusterIP 10.96.0.1 <none> 443/TCP 4h22m
NAME READY UP-TO-DATE AVAILABLE AGE
deployment.apps/helloworld 2/2 2 2 10s
NAME DESIRED CURRENT READY AGE
replicaset.apps/helloworld-6c566c4f58 2 2 2 10s
# Get logs of POD to see if it looks healthy
❯ kubectl logs pod/helloworld-6c566c4f58-5v9ln
Running server…
We’re done here. Let’s push that (`git add — all && git commit -m “Add CD” && git push`)
Tear down the application from the Cluster as we’ll automate it’s deployment next. Run: `kubectl delete -k .`
### Prepare the ArgoCD Integration for the Application
_Note: The automation stopped working, or might be a bug with KIND, skip the following 2 steps, we’ll manually create the application. Will reiterate the 2 next steps when I figure out the issue, altho I have the exact same schema running in production for dozens of applications right now, could be useful for document purposes (or we can try with another Kubernetes provider)_
Now that we have an Application with a build cycle, resources (`deployment.yml` and `service.yml`) that are ready to be deployed, it’s time for ArgoCD to shine.
- `cd ~/code/argocd-tutorial/terraform`
- Create `application.tf` file and paste this content:resource “argocd_application” “helloworld” {
metadata {
name = “helloworld”
namespace = “argocd”
labels = {
“dev.seraf.app/name” = “helloworld”
“dev.seraf.app/cluster” = “kind”
“dev.seraf.app/tags” = “tutorial,go”
}
}spec {
project = “myproject”source {
repo_url = “https://github.com/serafdev/argocd-tutorial”
path = “deploy”
target_revision = “master”
}destination {
server = “https://kubernetes.default.svc”
namespace = “helloworld”
}sync_policy {
automated = {
prune = true
self_heal = true
allow_empty = true
}sync_options = [“CreateNamespace=true”] retry {
limit = “5”
backoff = {
duration = “30s”
max_duration = “2m”
factor = “2”
}
}
}
}
}
_Notes: Well this went wrong, for now I created the Application manually to verify if everything is OK, but the above failed. To create it I did it manually on the GUI:_
- Click + New App and Enter the same data as the above `application.tf` file as shown:
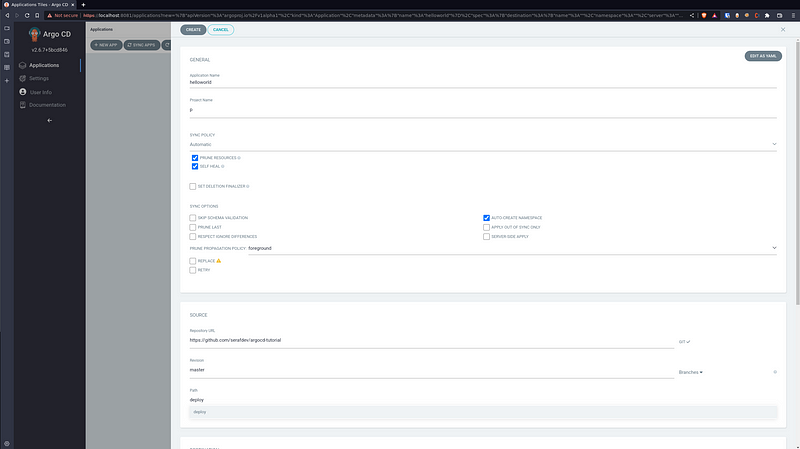
You’ll see the application deployed:
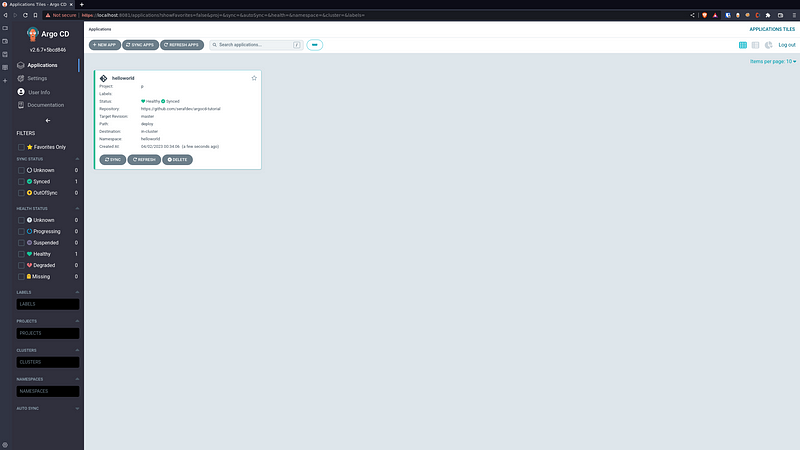
With the resources graph when clicking on the helloworld app:
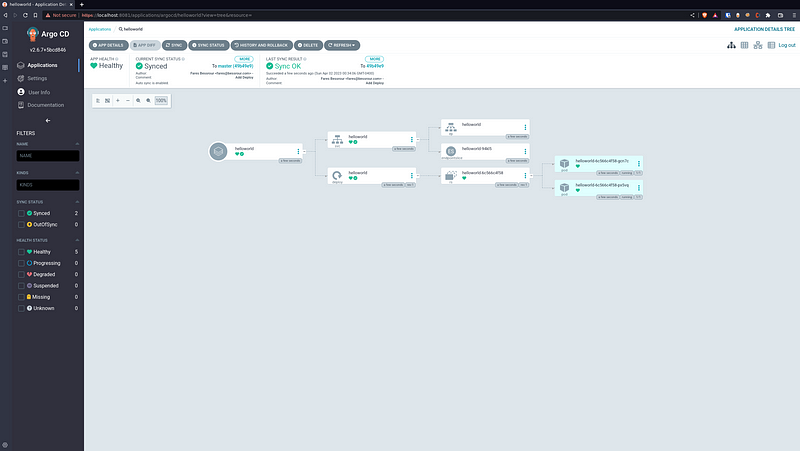
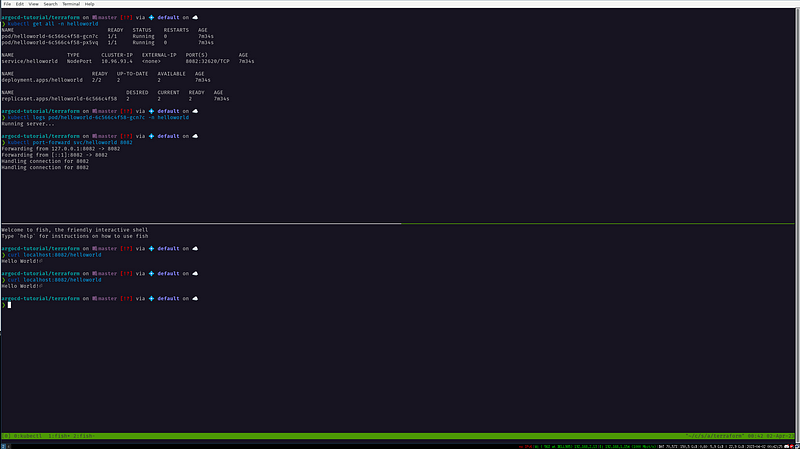
In Kubernetes:
Thanks! Hope you liked the small tutorial, subscribe to the Newsletter for more like these!

Comments (0)